Friday, January 27, 2012

Friendship


It is appropriate that this week's challenge at Card Crafter's Circle is about friendship and is called FEEL GOOD WITH A FRIEND. I am late getting my DT blog posted because I was on the computer for hours last night arranging a flight to visit two special friends. I will be flying to Indianapolis 17th February, and to say that I'm excited is quite an understatement! Anyway, on to this week's challenge card as I've procrastinated this post long enough.

Our sponsor for this week is Happileigh Scrappin'! Leigh creates both coloured and uncoloured images, and they are delightful! Our randomly drawn challenge winner will receive the fabulous selection of digital images that our design team used this week... what a great prize!

My image is called Tea Cup Stack (http://hlscteaparty.blogspot.com/). Isn't it beautiful? I did actually colour my own image using the black and white digi, but I ended up using the coloured file from Happileigh for my card instead. Although I liked my own work (and will use it for another card), I liked the soft, Victorian look of the coloured image Leigh provided. (I'm an old fashion gal at heart in many ways - grin!)

I used a soft, printed DP that also had (to me) a Victorian feel. The card base is white with a layer of green then the DP.  I cut the Happileigh image out using a Marianne die (CR1204) which I got from Dutch Paper Crafts (link in my sidebar). This lovely die comes with the oval frame and three flower petal shape dies. The flowers at the top of my card were made using the flower petal dies and giving dimension to them by cutting, curling and stacking the pieces. The leaves are cut from a die (Cheery Lynn B117) that I also got from Dutch Paper Crafts. Lastly, I added a sheer ribbon and bow. There is plenty of room at the bottom of the card to add an outside sentiment appropriate to whatever your need (a nice rectangle with inked edges then matted on the green would look great and is what I should have done -- am a wee bit frustrated that I didn't quite "finish" this card, but it is gone so can't add the sentiment as I should have).

So there you have it. I hope you will be inspired to create your own friendship card -- next to a good family, good friends are life's greatest blessings. Remember not to take them for granted and to tell them often how special they are.


Sunday, January 22, 2012

I've Debuted


My first set of designs as a DT for Dutch Paper Crafts debuted today with a video of the dies and cards that I made. It was really rather exciting. If you would like to see the video, it is at http://dutchpapercrafts.blogspot.com/2012/01/marianne-craftables-for-sale.html?utm_source=feedburner&utm_medium=email&utm_campaign=Feed%3A+Dutchpapercrafts+%28DutchPaperCrafts%29

It is my intent, now that Darlene has the projects posted, to show them individually here on my blog with instructions on how I made each even though Darlene did give an over-view of what I did on her video. The operative word in the above sentence is "intent."  I'm currently working on the second assignment for Darlene. There are 12 dies in my new set, so am working hard to get the samples done and back to her ASAP.

This new adventure in my life has been so much fun. I never imagined that I would be so blessed to have the opportunity to share my work with others in such a manner. The dies that Darlene carries at Dutch Paper Crafts (remember, the link is on my sidebar) are some of the prettiest dies available to us crafters. She strives to give us the tools, at reasonable prices, to make it so easy for anyone to create beautiful works of art.

Thursday, January 19, 2012

Bear the Challenge


I have to admit that it took a lot of constraint on my part to keep from using all various forms of bear puns for the title and beginning of this blog entry. This week's challenge at Card Crafter's Circle is to use bears, and our delightful images were provided by Janet, at Pink Gem Designs! Our randomly drawn challenge winner will receive their choice of any 4 Black/White images from Pink Gem.

Our DT have provided some wonderful cards for your inspiration, so drop by http://cardcrafterscircle.blogspot.com/, have a look and then get creating and enter your own wonderful bear artwork in our weekly challenge.

My card was made using Fairy Teddy (http://www.pinkgemdesigns.com/catalog/fairy-teddy-digi-stamp-p-778.html). Isn't that just the sweetest, most huggable looking little teddy? The image came in .png format, .jpeg format and colour graphic format. The .png and .jpeg are black and white images allowing you to colour as you desire. The coloured format, of course, is already coloured for you. I chose to colour my own image using my Copic markers. I then cut out the image using a classic oval Spellbinder die. I cut a second oval from pearly hot pink card using the Spellbinder beaded oval die, and I layered the image onto the pink. My card base is white card, then a layer of the same hot pink and then a layer of piece of stripey paper from a We R Memory Keepers 6" x 6" paper pad called "Love Struck." Across the stripey paper, I've added a strip of dotty paper from the same pad. Atop the dotty paper, I've added white satin ribbon and bow. Below the bow, I added some small pink roses and two stick pins (Wild Orchid Crafts). Lastly, I printed a computer generated sentiment which I cut into a circle and backed with an embossed circle of the hot pink. I popped the ovals with image up using pop dot foam, and I lifted the sentiment slightly using less thick pop dot foam.

I hope my little card will help inspire you. Thank you for stopping by.

Stay Tuned

This post is sans photo. I have some exciting news that I've been wanting to share with you, my wonderful followers. Do you love those fancy doilies and die cuts that you see on many beautiful cards? Do you want to enlarge your cache of tools that make your card making and scrapping easier? Do you constantly wish you would win a lottery so that you can buy the dies and tools on your ever growing wish list?

A month or so ago, I was contacted by a wonderful lady by the name of Darlene Placito asking if I would be interested in creating samples for her online blog store using some of the industry's more beautiful dies. Of course I jumped at the chance. I'd been purchasing Marianne, Cheery Lynn and Memory Box dies from Darlene for some time. I found her prices to be, in many cases, better than those of other vendors, and her service and personal attention to orders superb. I felt honored and blessed that Darlene contacted me.

I would like to ask that you take a look at Darlene's site (click on the photo to the right and it will take you directly there). Dutch Paper Crafts is set up in blog format. You can scroll down (and then click "older posts" for more) to see samples of the products Darlene offers. In order to place an order, you need to email her. If she is out of a product, she will immediately contact you (in many cases, she will try to get it for you). The site is a little different from the usual online "stores" in that you don't have a click to order option, but let me assure you that Darlene will answer you ASAP -- her prices and service are well worth the little extra effort.

I hope, soon, to be able to share some of the samples I've sent to Darlene. In the mean time, I will continue to share my weekly DT card for Card Crafter's Circle (newest to be posted later this evening) as well as personal cards (which haven't been as many lately) as I make them.

Thank you for continuing to support me by following my humble little blog. Blessings to all of you.

Thursday, January 12, 2012

Birthday Challenge

This week, at Card Crafter's Circle, the challenge is to make a birthday card. Our delightful images were provided by our wonderful sponsor the awesome MelJens Designs! Our randomly drawn challenge winner will receive their choice of 4 Black/White images... what a great prize!

My card uses this delightful little rodent popping out of a yummy cake (isn't he darling?). He is called Birthday Cake Mouse and he can be found at http://shop.meljensdesigns.com/Birthday-Cake-Mouse-MD0039.htm.  If you check out the DT cards at the CardCraftersCircle blog, you will find some amazing (and colourful) cards, and of course, we'd love to see your own creations using the birthday theme.

My image was printed onto Cryogen paper and coloured with my Copic markers. I then cut the image into a circle using one of my Spellbinder dies. The decorative circle behind the image is a Marianne Design die (LR0152). I did not emboss the Marianne die this time (although that would have also worked), but opted to leave the space (where you see some pearls) blank. The center (white) section is cut using a Fiskar's border punch. I punched a strip of the border and then flipped it top to bottom and cut another strip of the design close to the first strip to make the design. The oval sentiment was a freebie. The pink border around the sentiment is made by colouring with one of the colours I used for the cake frosting. I cut it out and then used small pop-dots to lift it slightly off the card. I added the blue pearls around the Marianne die cut, the upper corner of the card and on each side of the sentiment.

Hope you enjoy.

Thursday, January 5, 2012

Make It Colorful


It is Thursday again, so that means another wonderful challenge over at Card Crafter's Circle (http://cardcrafterscircle.blogspot.com/). This week's theme is "Make It Colorful." We'd like to see your super fun creations -- the more colorful the better (grin). I always like cards with lots of happy colors, and even more right now as the winter grays seem to be predominate everywhere. I definitely prefer the spring time with its warmer temps and lively blooms burting forth. Ah well, since I don't live on a tropical island, guess I must take each season in its turn.

We are fortunate to once again have as our fantastic sponsor the the uber-fabulous... Bugaboo Stamps! Our randomly drawn challenge winner will receive their choice of 7 Bugaboo images... what an awesome prize because Bugaboo offers some absolutely darling images!

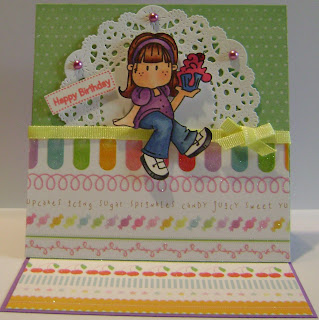
My image is the BBrat Girl Cupcake Sitter (http://www.bugaboostamps.com/BBrat-girl-cupcake-sitter_p_310.html). Isn't she a cutie? I colored her with my Copic markers on Cryogen card, then fussy cut her out. Using card cut at 6"x6", I created an easel card. I covered the packground with green dotty paper. The dots are raised and have a bit of sparkle to them. The lower half is a piece of DP from DCWV. The design includes several strips of candies, jelly beans, and cherries (the latter is seen when easel is standing). Those are all slightly raised with a bit of sparkle. All the papers work to create a nice, colorful and shimmery effect.

I placed a doily (Cheery Lynn die) on the green dotty paper and a small yellow ribbon at the point where the two papers meet. Using pop-dots, I lifted the little Cupcake Sitter for dimension and "sat" her atop the ribbon. I added three pink pearls at three points on the doily and then stamped the sentiment, using pink ink, onto a scrap piece of the Cryogen, cut it out and placed it beside my little image.

I am entering this card in the following challenges:

Tuesday, January 3, 2012

New Year - New Card


This is not my first card for the new year; however, it is the first card I can share right now (grin). I've been busy getting "ahead" by making the cards for the next several assignments for the Card Crafter's Circle DT. Can't wait for you all to the see the darling images that our various sponsors have provided for us. We have some super creative people sponsoring the Card Crafter's Circle. You really need to stop by weekly (if you don't already). In addition to weekly challenges, wonderful prizes, and different designer sponsosr, there are also some really great tutorials for you to view. The location is: http://cardcrafterscircle.blogspot.com/ so do pop over there after you leave here.

Since I am now about three weeks "ahead" for my DT cards, I decided to make this little card for myself. Valentines is closer than we realize, so I've made this little card into a Valentine card. I used one of the adorable Magnolia images, and coloured her up in Valentine colours using my Copic markers. I did not particularly want to fussy-cut her, but since she had been stamped on a piece of scrap card (with funny bits already sliced out), there was no room for even the simple dies to "fit."

As seems to be my "norm," I started with a white card base. The dotty background paper is from a 6x6 We R Memory Keepers pad that one of my dear giflfriends gave me for Christmas, The solid pink strip is from my stash and has embossed hearts (which were part of the paper design). I added a lacy doily cut with a Cheery Lynn die (DL102, French Pastry) and some lovely flowers from Wild Orchid Crafts. Lastly, I added a small sentiment under the flowers (simply Valentine) which I stamped using pink ink. The stamps are by Spellbinder and have a variety of words as well as little boxes and circles in which to place the words.

So there you have it. A fun little project for a quite chilly (for the south) afternoon. (Have I mentioned that I am so NOT a winter person? If not, well now you know (grin)!)

Card entred in the following challenges: