Friday, February 24, 2012

Photo Inspiration


It's that time of year when the northern hemisphere is approaching an end to their winter... and those in the southerner hemisphere are seeing summer's end... So how about some vibrant colours? The challenge theme at Card Crafter's Circle this week is to take INSPIRATION FROM THIS PHOTO for your creation!

Grrr, my blog is not cooperating with me today. I had a choice of centering the inspiration photo and all subsequent text afterwards or to move the photo to the left with the text lining up correctly. I opted for the latter as I figured that would be much easier to read (grin).
 
 
Anyway, my little DT card was completed while I was on my trip to Indy. I picked the purple colour from the flower picture for my main theme. The card base is white with a purple patterned paper (from a pad of Michael's brand paper) on top. I cut the edge of the paper using a Martha Steward scallop punch. The punch leaves a hole in the center of the scallop, and I've centered a purple pearl inside each. My little image is by Saturated Canary. I believe she is called Silver Fairy, but her dress reminded me of flower petals, so in keeping with the theme, I coloured her with some of my Copic purples. Her under skirt is a soft aqua colour (another of the colours in the inspiration photo). There is another piece of patterned paper (which does not show up well in the photo) from the same pad. I cut a border using a Cheery Lynn dies which I placed over the strip cut from the second patterned paper. In the right hand corner, I punched small flowers from card in the pink/salmon colours to continue the flower theme and pick up another colour from the photo.
 
 
I have to admit that colouring my image took longer than putting the card together. It is a simple layout, but is a nice backdrop for the image, keeping it center-stage.
 
 
We would love to see what inspiration you gleen from the photo. Please share whatever you create with us over at the Card Crafter's Circle blog (http://cardcrafterscircle.blogspot.com/).
Our  sponsor is DI'S DIGI DOWNLOADS! Do visit the store, for the sweetest images! Especially if you have a penchant for bears! Our randomly drawn challenge winner will receive a $10 store credit, equating to 4 digital images, or to be used against a larger purchase... a great prize!

Thursday, February 23, 2012

When in Doubt

Doesn't this little image just make you giggle? It is one of Mo Manning's, and I just adore all of her images of little children. They are so very sweet and innocent looking (even the little imps who are really guilty of something -- probably of being too sweet -- grin).

I have some new DT assignements waiting for me, but when I went into my craft room this morning, I felt like I wanted to do something just for the fun of it with no pressure, so instead of doing something I "have" to do, I did this little card instead.

The base is very pale pink Bazzill card. Atop that is a layer of  designer paper from a little pad called Pink Petticoat Wild Blossom collection. Across that layer, I placed another piece of DP from the same pad which I first matted with the pale pink Bazzill. I adhered a strip of lace and a length of pink dotty ribbon. I cut my little image using a round Spellbinder Nestibility die and used foam 3D dots to lift it slightly. The saying which I matted on the light pink and then inked around reads: "When in doubt -- just giggle & do something adorable." Lastly, I added roses from Wild Orchid Crafts and three pink pearls of decreasing size.

That's it! Very easy and feminine little card all ready to send. The inside simply has a square of the paper that I used on the front. When I'm ready to send this card, I'll find a suitable saying/sentiment and will probably stamp or type it onto white card and cut it in a circle to mimic the basic design on the front.

Hum, wonder how long I can get away with just playing instead of working on my assignments. Naw, better not -- I have commitments, and my Daddy taught me that if I've said I'll do something then I'd darn well better keep my word. OK, no problem. The nice thing about my commitments is they are centered around my hobby and craft, so it's like playing anyway (grin). Do what you love and love what you do -- can't get any better than that, eh?

I am going to enter this little card in Mo Manning's challenge for this week at http://mosdigitalchallenge.blogspot.com/

Wednesday, February 22, 2012

Two View Points

Bonnie Kohane's Card

My Card

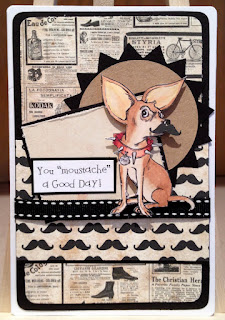
I was the last person to leave my friend's house after our crafting weekend because my flight was the latest. Bonnie wanted to enter the Challenge at Mo's Digital Pencil, so I suggested she go ahead and work on the card while I was there, and I'd just chit-chat with her while she was working (my suitcase was already packed with all my craft supplies). Bonnie had just purchased a new little 6" x 6" paper pad, and the papers were so nice and very masculine looking. We liked them so much that Bonnie insisted that I at least make the base card using the papers as it would be easy for me to just slip it into my bag or my purse for bringing home. 

The first card above is Bonnie's card. After looking at her Mo Manning images, we decided little Spike would be cute (she wanted a little boy dressed up in Daddy's clothes, but we didn't find exactly what she had in mind, so substituted Spike -- which I think turned out adorable!). After colouring her image and cutting him out, she decided she would like to use some kind of pun that emphasized the moustache; thus her saying. Finally, she asked me what I thought about her putting a moustache on Spike -- well I, of course, thought the idea was perfect, so fussy-cutting one of the little images from the background paper and using a 3D foam dot, her little card was ready for her to enter into the challenge.

I did not have an image nor sentiment in mind for my card until after I got back home. Going through my Mo Manning images, I found "Introducing Oskar." Doesn't he look like a sweet grandfather? After colouring him up, fussy cutting him out and mounting him to my card, I printed off my sentiment. It was not quite the one I wanted to use, but it works. That same sentiment would also work for birthday -- I don't know why I decided to use anniversary -- just one of those spur of the moment thoughts, I guess. I just felt that the original verse was incomplete and needed the last part to indicated the purpose of the card.

So there you have it -- two view points for the same background which is one of the fun things about creativity -- even when using the same supplies, we may see things differently -- we add our own style, personality, view point. Wouldn't this world be totally boring if we all saw things exactly the same -- well, probably not since we wouldn't know anything different -- but I'm sure glad we are free to create our own beautiful environment -- whatever that may be for each of us.

Tuesday, February 21, 2012

Hello, I'm Back

Hi blogger friends. Have you missed me (grin)? I have been visiting wonderful friends in Indianapolis since Friday -- got home last night about 10:30 pm. Can't really express in words what a delightfully fun time I had, but I now have some new, fantastic memories. Three other friends and I spent the four days at the home of my friend, Bonnie, chatting (lots), laughing (lots) and crafting (lots).

The little card above is one that I made while on my visit. The idea came from a card we saw at the Indy Archiever store. (You can see the inspiration card at http://www.archiversonline.com/events/438 It is the card with the tulips.) Of course, the five of us had to add our own individual touches, in my case, the little mini-Magnolia butterfly image. We also used a different background stamp than the inspiration card (Stampendous Stamp P116-R, Flower Fields), and we added our hand-made flowers. (To be perfectly honest, I had to look up what the original inspiration card looked like. As you will see, if you go to the Archiever link, we completely altered it (grin).)

The base of my card is made from a plum coloured cardstock. On top of that, I placed a green mat. The background image was stamped in green on white card. The supplies we used belong to Bonnie, so we used what we had on hand. The stamp has flowers with long stems, so anything in your own stash that is similar would work. Because we knew we would be covering most of the flowers, the stems and leaves were the only things we were concerned with; thus, we just stamped the entire image using green ink. We then cut three flowers from fleece (we did decide that craft felt might have worked better because it is a heavier/stiffer material) using a rolling flower die (you know, the kind that gives you a spiral that you then roll into the flower shape). The completed flowers were adhered on top of the stamped stems. We added the green and white ribbon because the zig-zag green reminded us of grass. We then cut a tiny tag from a Cricut cartridge (I think it was Picturesque). Some of us tied the tag to the knot of the ribbon bow using thin twine. I chose to stick mine behind my bow instead.

I already had the mini-Magnolia stamp coloured up, so I fussy cut it. Those mini images are really tiny, so are not easy to fussy-cut. I don't recommend it unless you have lots of patience, which I don't have. In fact, can't believe I did it (LOL); however, I did not want anything obstructing the flower stems behind the little butterfly girl. To finish it off, I added pearls and a gem to the center of the flowers, a punched butterfly (think I remember that being a Martha Stewart punch), and my little tag that reads, "Hello."

What was really fun about this little card was seeing how different they all turned out. Five of us basically created the "same" card, but they didn't look the same at all. We each added our own touches which individualized each card and kept them from looking like duplicates. Really fun experiment.

I will enter this card in the following challenges:

http://flutterbywednesdays.blogspot.com/2012/02/flutter-by-wednesday-190.html - Flutterby Wednesday, Things with Wings
http://stampingscrappingchallengecentral.blogspot.com/ - Say it with Flowers (Little Tilda is coloured with Copic markers on Cryogen paper - both sold at Stampingscrapping.com)
http://crazychallenge.blogspot.com/ - Use a Die
http://cutiepiechallenge.blogspot.com/ - Flowers
http://cutedaisymay.blogspot.com/ - 3D Project

Thursday, February 16, 2012

Cheating a Bit - New Challenge

I'm cheating a wee bit in that I'm posting my next DT card for Card Crafter's Circle before CCC's blog comes out with the new challenge. I have to be up at the crack of dawn (not even sure the sun has started coming up that early yet, so it may still be pitch black) to make an hour and half trek to the Atlanta airport. I am flying off this weekend for a "girls only" weekend with four of my friends. We plan to do a lot of eating, crafting, gabbing, shopping -- and anything else that might strike our fancy for the next four days. I'm all a twitterpated over the trip! Anyway, back to the topic -- the new CCC blog doesn't go live until much later as it is based on Australian time, and since I'll not be around for a few days, I'm posting early.

Our challenge for the coming week is called Dies to Die For. While we really don't want anyone dying (please), we would like to see what you can do with dies.We want to challenge you to use DIE CUTS in your creation! Do feel free to use PUNCHES as well, as they are die cutters as well! They can be commercial, or cut by yourself! We are excited to introduce a new (to us) sponsor LIMITED RUNS!  Our randomly drawn challenge winner will receive 3 digital Limited Runs images of their choice...

So, my little card used one of the cupcake images. I know that Valentine's Day has passed, but it hadn't even arrived when I made my DT card, and since the image (chosen for us by Limited Runs) featured hearts, I had to go with the love theme, right? I think this would be a cute little card to give to your sweety or a child/grandchild any time -- we don't need a special day to tell someone special that we love them, right?

I chose to paper piece my cupcake, using various bits and pieces of different scraps for the frosting, candy hearts, wrapper and little heart on the wrapper. After piecing each part, I used a red card base with a layer of black and a layer of printed paper (pad by We R Memory Makers). The bingo card is an altered card. I cut out the letters using my Cricut Expression and the Storybook cartridge and after adhering them to the top and bottom of the card, I scanned the card and printed it so the letters looked as if they were printed on the card rather than adhered to it. I layered the bingo card onto black.

I cut a piece of red dotty paper (from the same paper pad) and matted it onto a piece of black. On top of that, I placed a lovely Marianne die (CR 1202 - I really like that little die. It can be purchased at Dutch Paper Crafts). I tilted the top two layers (the red dotty paper and the bingo card) in opposite directions, and then I adhered the cupcake to them both using foam dimensional pop-up dots. This card is a little more austere than you may be used to seeing from me, but the combinations of so many papers and the cute simplicity of the image seemed to be enough for this little sample. I hope it is not too simple as to not inspire you to dig out some dies and make your own entry for the challenge at Card Crafter's Circle. We'd love to see what you create!.   

Wednesday, February 15, 2012

Celebrate

Here is another card using those beautiful dies from Cheery Lynn (may be purchased at Dutch Paper Crafts). This time, I used three different dies to create this simply elegant card. The blue and white color scheme gives the card a sophisticated look (in my opinion) and emphasizes the beauty of the dies.

Again, I started with a white card base. I layered blue, then white again, then repeated that. On top of the last white layer, I glued down a lattice frame (French Lattice Small - FRM132). I then cut two strips of Queen Anne's border (B160) and butted them up to each other in the middle of a blue strip. I added sheer blue ribbon and a double loop bow over the middle of the two border dies. The little flower under the bow is made using the Cutie 4 (B156) die. I cut the die twice and glued them end-to-end so that I would have a long strip to roll into my flower. Using a quilling tool (but you can do it with your hands or needle nose pliar), I rolled the long strip, keeping it tight in the center and then loosening it towards the end. This spread the outer (lower) petals out a little more while keeping the center tight. You can fiddle with the flower to make it to your satisfaction. I used hot glue on the bottom to keep the flower together, but I did trim off some of the bottom so that it would sit flatter on my card.

I typed the sentiment on my computer using two different fonts (sorry, I didn't write them down) and spaced the words to my liking. I then changed the color of the print to dark blue to match the card. You could, of course, use a pretty stamped image instead, but despite having way too many word/sentiment stamps, I didn't find one in my stash that fit for me. I did use my Spellbinder oval dies to cut out the sentiment and the subsequent matting. I have both sets of the ovals, so was able to cut three that fit nicely on top of each other. I cut the sentiment oval, then a blue oval and finally a white oval. Oh, the leaves for the flower are cut from a Sizzix die that I've had for over a decade. I cut them from the blue paper because I did not want to introduce another color.

Thank you for visiting me. I hope this card will inspire you to pull out any dies or punches you might have and see how you can use them. Of course, these are beautiful dies, so if I've inspired you to use them, then do email Darlene at Dutch Paper Crafts. She has just listed these dies and is giving a discount over the SRP -- really good deals. I'd love to see what you do with these dies.

Happy crafting!

Tuesday, February 14, 2012

Butterfly Beauty

As I started downloading the photo of this card, a song which I haven't heard in years popped into my head. It is called "Bullfrogs and Butterflies." It was on an album my children loved when they were little and then my little granddaughter. I can't remember all the words to the song, but the first line is "Bullfrogs and butterflies -- they've both been born again." Of course, that line is going to be stuck in my head all day, and I'll be "bugged" because I can't remember the rest of the song -- hate it when my memory fails me. You know what is going to happen, right? Somewhere in the middle of the night I'll remember the words (LOL)! Maybe I'll just do an internet search and see if I can put my mind at rest early (grin).

Anyway, I made this card for Dutch Paper Crafts. The card base is white, layered with a piece of card that has subtle sparkles in it. The DP came from a pad by Die Cuts With a View called Linen Closet. Now comes all the really pretty parts. I used three Cheery Lynn Dies (DL105, Oriental Butterfly, FRM133, French Lattice Large Frame, and DL130, Dutch Doily Rectangle Frame). All three dies can be purchased from Dutch Paper Crafts (just email Darlene with the names and numbers) or visit her blog (link in my side-bar). I cut all three dies from white. I layered the rectangle frame on top of the French lattice. I cut two butterflies so that I could layer them one on top of the other. I folded the top wings upward to give the die cuts dimension. I added graduating size pearls to the body of the butterfly and also to the corners of  the French frame.

I know I took a photo of the inside, but searched my computer and could not find it, so you'll have to use your imagination (sorry). I cut another piece of the DP that I used on the front. I cut another French frame which I placed on top. I then typed a poem using my word processing program and printed it off. I cut the poem so that it fit inside the French frame. It made a lovely inside.

This card was really quick to put together, but the beautiful dies provide such a WOW factor that people will think you spent hours making it. The poem I used inside my card was about friendship, but this would make a beautiful wedding card, sympathy card, birthday card, or for any occasion.

I am entering this card in the following challenges:

http://sirstampalotchallenge.blogspot.com/ - In the Garden
http://onestitchatatimechallenge.blogspot.com/ - Anything Goes
http://scrappyfrogschallenge.blogspot.com/ - Die Cuts
http://cupcakeinspirations.blogspot.com/ - Photo Inspiraton (the colours inspired me)

Monday, February 13, 2012

Absolutely the Last One


OK, I know I said last night's card was the last Valentine, but I do have one more to share before closing out this Holiday (grin). This one uses a sweet Magnolia stamp and is perfect for your "significant other." Don't Tilda and Edwin look sweet together?

For this card, I went a little outside my comfort zone with the papers that I used. I don't usually use such a busy print, but the colours were just so perfect that I had to give it a try. The background paper and the matching pink patterned strip are from a 6" x 6" Crate Paper pad called "Random." I started with my "usual" white card for the base (I seem to be getting in a rut; need to work on that - grin), and layered the floral on top. Before adhering the pink strip, I centered a piece of white lace across it.

I coloured the image using my Copic markers. I then used a beautiful Cheery Lynn die (DL183, oval doily stacker one) to cut out the image and frame. I'm a big fan of Cheery Lynn dies. Not only are they beautiful, but they are made in the US, and I fully believe in supporting American businesses. Any way, you can buy this beautiful die from Darlene at Dutch Paper Crafts. In fact, she has just released this die and others with some fantastic discount prices.

Least you think my mind is hopping all over the place, let me finish sharing my little Valentine card. After cutting out the image using the middle size die, I cut another piece from white using the smallest oval from the Cheery Lynn set. I stamped my sentiment onto the small oval and then matted it with a piece of the pink I used for the strip at the bottom. Lastly, I added three roses and two cherry blossoms from Wild Orchid Crafts.

Sunday, February 12, 2012

One Last Valentine


One last Valentine card to share with you all. The first image above is the outside of the card, and the second image is the inside. This beautiful little card was made using the same die that I used for the card I shared in my previous post. It is called Sophia's Heart (DL184) by Cheery Lynn, and as you can see, it is quite versatile. (You can purchase the die from Dutch Paper Crafts, the link in my sidebar. Just email Darlene, and she'll be glad to fix you up with one.) The die is 5 1/4" x 5" (133mm x 127mm) in size. I decided to cut the center section out of the die and use it on the front of my card, then use the outer section that I cut off for the inside of my card.

I cut a 6" x 6" card base from white Bazzill card. I then layered a piece of pink card atop the white. On top of the pink, I placed a layer of black that I cut using the largest die from Nesting Lace Squares by QuicKutz. On top of that, I layered the next size down from the lace squares dies cut in white. (Yes, lots of layers, but I wanted to use all the colours.)  I then centered the middle of the Cheery Lynn die which I cut from pink in the center of the white die. I ran a piece of pink dotty grosgrain ribbon behind the black layer and tied a double loop bow to the side.

For the inside, I simply adhered a piece of black to the card base, leaving a white border all the way around. I adhered the pink outer portion of the Cheery Lynn die to the center of the black. I then stamped my sentiment using a stamp by Rubber Stampede (A2104E) and VersaColor ink. I cut the sentiment using my circle Spellbinder die, and I inked around the circle with the same ink that I used to stamp the sentiment.

This card is elegant in its simplicity and much prettier than the photos show. My little granddaughter, Claire, was quite excited about this card because she helped me make it. She's my little crafting buddy and enjoys cutting the dies and doing the stamping. She has already developed quite a good eye for design and colour. I hope she continues her love for crafts because I need someone to leave my room full of crafting toys (er, I mean tools) to when I no longer can hold scissors or paper in my feeble old hands (not any time soon, though -- grin).

Friday, February 10, 2012

Valentines Love Hearts

VALENTINES LOVE HEARTS!

I copied the below header and description of this week's challenge at Card Crafter's Circle straight from our blog. Our DT coordinator and leader did such a nice job that I thought I'd just use her words in toto. They say it all. Thanks, Pauline.

Double entendre is intended here... with the above phrase! Valentines love hearts, no mistake. But if you don't want to make a VALENTINE, create a card celebrating LOVE, or use HEARTS in your creation! Simple!
We are excited to have a fabulous returning sponsor, DEARIE DOLLS! At Dearie Dolls, you will find both coloured and uncoloured images, and they are delightful for every occasion! Do visit the store, and spoil yourself with something sweet (no calories, I promise)! Our randomly drawn challenge winner will receive 3digital images of their choice... what a great prize!
Now for a description of what I did for my little DT project. The image I used is called "Shy Valentine." It is such a sweet little image. I printed it off on Cryogen paper and coloured it with Copic markers.
My card base is "hot" pink card layered with a panel full of Valentine/love appropriate words. The DP came from a little 6" x 6" We R Memory Makers pad that was a gift from a girlfriend (and boy have I used that pad over and over).  On top of the word sheet, I placed a strip of coordinating dotty paper  (another paper from the pad) which I matted with a piece of blue card that matches the blue color on the word sheet. Atop all that, I placed a beautiful die which I cut from the same "hot" pink using a beautiful doily die by Cheery Lynn called Sophia's Heart (DL184) which can be purchased at Dutch Paper Crafts (link in my side-bar). The little "Love" sentiment is computer generated. I finished this little card off with blue satin ribbon, and I went a little outside the box (for me) and sewed a pink heart button (I'm not a button gal and seldom use them) to the middle of the bow.
This was a simple and easy card, but I thought that little image was just too, too cute so I didn't want to do too much to distract from it.
Take a few minutes, if you can, and hop over to the Card Crafter's Circle blog to see the lovely Valentine/love cards that the other DTs created. You will definitely like what you see. Remember, Valentine's Day is coming soon, so get into your craft space and make something special for that someone special!


I plan to enter this card in the following challenges:
http://fabnfunkychallenges.blogspot.com.au/2012/02/challenge-107-love-is-in-air.html - Love is in the Air
http://mymumscraftshopchallenges.blogspot.com.au/2012/02/it-must-be-love.html - Love
http://thepapershelter.blogspot.com.au/2012/02/more-love-here-at-paper-shelter.html - Be My Valentine

Wednesday, February 8, 2012

Be Mine


Good day my blogger friends. Valentine's Day, the day of love, is fast approaching, so I made this little card yesterday for my 8 years old granddaughter. I had loads of laughs last night with her. We are making little Valentine goody-bags together for her classmates, and while working on them, she expounded on her ideas about crushes and love.Seems as if not too much as changed between the time I and her Mother were eight years old -- cute is the main and singular criteria for young love. Made me question at what age we start getting wiser and realize that there is a lot more to relationships besides looks. Oh well, at eight, looks and candy are enough -- let's not rush the innocence and delight of childhood -- it fades far too quickly as it is.

So, on to my little card. I'm showing the outside and inside of this little 6" x 6" valentine. The base of my card is red card. On top of that, I layered a piece of pink card (both were textured so either DCWV or Bazzill). The third layer is little dotty paper from a 6" x 6" We R Memory Keeper pad called Love Struck. My little image (stamp from The Greeting Farm) is on Xpress-It paper and colored with Copic markers. I cut the little image out using a classic oval Spellbinder die and layered it on the scalloped edge oval by Spellbinder. The red heart is also cut with a Spellbinder die and layered onto a purchased paper doily. I inked the edges of the doily with pink ink so that it would stand out a little bit more against the predominately white dotty paper. Lastly, the two tickets are Whimsy ticket stamps cut with the matching ticket die. I adhered the dotty ribbon across the top two layers before layering the image and other embellishments. Those sweet little roses are by Wild Orchid Crafts.

The inside (which doesn't yet have the sentiment) is made using the same pink card that I used on the front and then cutting and layering a smaller classic heart and scalloped heart (Spellbinder dies). I will, of course, add an appropriate and private sentiment especially to/for her.

Now, into my craft room to come up with two (more masculine) Valentines for her two brothers. One can never spread enough love nor too often tell those special people how much they are loved. At our house (hopefully) we don't need a special day for the purpose of love; however, it is kind of fun to get the chocolates, eh?

I plan to enter this card in the following challenges:
http://www.craftysentiments.blogspot.com/ - Let's Get Girly
http://digitaltuesdaychallenge.blogspot.com/ - Pink or Red
http://ladybugscraftsinkchallengeblog.blogspot.com/  Loves Me, Loves Me Not
http://sassycherylschallenge.blogspot.com/ - Be My Valentine
http://tuesdaytaggers.blogspot.com/ - For a True Love

Friday, February 3, 2012

White on White


This week our challenge at Card Crafter's Circle is to create using white on white. White is such an elegant colour (or is that lack of colour??) when layered on top of itself. You may use a wee bit of colour if you are using an image, but the base card should be white only. Our sponsor for the week is Whoopsi Daisy! Linnie creates delightful images, and there are so many darling ones from which to choose that you will have a hard time making your decision! Do visit her store and look around. She has great prices. Our randomly drawn challenge winner will receive their choice of two sheets of digital images.

The cards created and shared by the Card Crafter's Circle design team are visual delights, so hop over to http://cardcrafterscircle.blogspot.com/ and treat yourself to some fantastic eye candy!

For my card, I used the little starlight fairy image and a combination of different dies. The card base is white, of course, and onto that, I adhered a large scalloped square which was cut using a Lifestyle Crafts nesting lace square die. Next, I added a beautiful Dainty Dutch Deco Frame (DL141) by Cheery Lynn and then a round doily (floral doily motifs, S5-041) by Spellbinder. My image is lightly coloured using Copic markers and then cut out using the Spellbinder Labels Four (S4-190) nesting die. I printed the sentiment off from my computer and cut it using just the top portion of a Spellbinder's Labels Ten nestabilities die. Lastly, I added the little bouquet of white flowers from Wild Orchid Crafts and the little white pearls (from Michaels) in each corner.

White on white make such beautiful cards -- and there is no colour coordinating, so easy-peasy! I hope you will give it a try and then enter what you make in this week's challenge at Card Crafter's Circle (http://cardcrafterscircle.blogspot.com/). Hope to be back soon with more inspiration for you.

I am entering this card in the following challenges:
http://craftysentiments.blogspot.com/ - Punches and/or dies
http://mytimetocraftchallenge.blogspot.com/ - A is adorable
http://diecuttindivas.blogspot.com/ - Anything Goes
http://kaboodledoodles.blogspot.com.au/2012/01/challenge-104-its-all-about-girls-make.html - All About Girls
http://paper-craftingjourney.blogspot.com/ - Fairies and/or Angels